This particular installation was completed by Aqualon Interiors, at Bokissa Private Island Resort in Vanuatu. This 25m pool was hand dug, quite some time ago, and features numerous steps and benches that need to be allowed for. You can see there are quite a few cracks in the pool surface – these are caused by the frequent ground movement they get in Vanuatu. The obvious solution was Aqualux!

1. The shell is prepared. Depending on the original surface finish, it may involve
either grinding or rendering to ensure a smooth surface. This pool was previously
painted, so all that was required was a good sanding. Some pools will need to have
the return converted, and a vacuum pipe installed, with tracking points cut into
the floor and wall joints.
2. As this one was a 3D conversion the pool was professionally laser surveyed to
ensure a perfect fit.
3. New facia/step outs are installed as required, then retaining strips are attached to the perimeter.
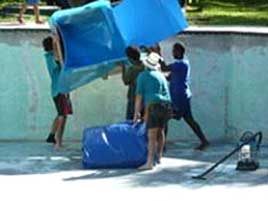
4. Once the shell is fully prepared, its time to bring the membrane in. Because this one was so big (318kg worth), it took a little extra man power to get it out of the crate!

5. Once the membrane is out, its a matter of rolling it out, bit by bit..

By bit...

By bit...

By bit...

7. Once it has been pre-hung, it is ready to be secured into place.

8. Now its time to start vacuuming it into place.

9. This particular pool holds a quarter of a million litres of water – and it has to stay under vacuum the whole time.

10. As it continues to fill;

lights etc are all fitted;

and the water level comes up.

11. Fitted, filled and ready for swimming!