Evaporation and Swimming Pools

Love them or hate them, there’s no denying that a pool cover can save massive amounts of water.

Just how much water they save depends on a number of factors (such as the pool surface area, the amount of wind, shade, and water/air temperatures). Anywhere between 2mm and 10mm of water every day is seen as an acceptable water loss – but this all adds up – and without rain or top-ups, a pool can easily lose its entire volume of water – every year!

The single most effective thing a pool owner can do to save water is to buy (and use) a pool cover. To be honest, it doesn’t even have to be a proper pool cover – any sort of covering will help prevent evaporation – it’s just that a pool cover will be more effective, will last longer, and will be easier to use than say – cling wrap or builders plastic.

So how does it work? It’s all about evaporation. Evaporation happens when water turns into gas (such as steam, when you boil the kettle). Obviously, your pool is not boiling like a kettle, but the theory is the same. On a hot, sunny day, the water inside your pool gets warm – here in Queensland, even an unheated pool can reach temperatures over 30 degrees in Summer. Once the sun goes down and the air temperature drops to below that of the water, evaporation will occur.

Without a cover, that water vapour will release back into the atmosphere – but with a pool cover in place, it can’t escape and stays in your pool, where it belongs. (Going back to the boiling kettle analogy – if you look under the lid of your kettle after it’s boiled, you’ll see it’s covered in steam which has turned back into water droplets).

The majority of evaporation will occur in the evening and very early morning as the sun goes down and comes back out – so this is the most important time to use your pool cover if preventing evaporation is your main priority.

There are other ways to prevent water loss to evaporation – anything that reduces the amount of wind and sun on the pool’s surface will help, so things like a shade sail over the top, trees around the fence line – adjacent buildings – they’ll all contribute to reducing evaporation. The single best thing to do though, is use a pool cover. A mesh leaf and debris style pool cover (like a Pooltex or Leafstop) will stop around 50% of evaporation, and a solar cover such as the Oasis Solar Cover range will pretty much stop evaporation completely.

ABGAL Oasis Solar Pool Covers have been independently tested and proven to stop up to 99.84% of evaporation. They are Climate Care Certified, Smart Approved WaterMark Licensed, and Water Wise accredited, complying with water-saving standards across all drought-declared Australian states and territories.

How do I get rid of the scum line around my pool?

Had extra people in your pool lately? You may have noticed a ring of grime around the waterline. If it’s a yellowish colour and feels a bit greasy to the touch, it is more than likely a combination of sunscreen, moisturisers, dead skin cells and body oils etc – it sounds gross, but they can float on top of the water and stick to the walls.

If you have a vinyl-lined interior such as Aqualux or a fibreglass shell, you can usually just wipe it straight off with a microfibre cloth. Get it while it’s fresh and you won’t need any chemicals – just a quick wipe will do it. (It’s even easier if you can throw the cloth at the last person in the water and get them to wipe the waterline down before they get out!)

Anyone who routinely gets a lot of waterline scum in their pool may benefit from using a chitosan-based clarifier such as our Vinyl Care & Protect or the Lochlor Ultra Kleer 4 in 1- products like these bind the fats and oils together and allow them to be filtered out, so they don’t sit on top of the water – thus preventing the scum line appearing in the first place.

Throwing a couple of clean, new (and fuzzy) tennis balls into the pool can also be helpful – as they float around they will pick up oil from the surface – just be sure to change them over regularly.

If you’re lucky enough to have a shower by the pool, a quick 10-second shower before jumping in goes a long way to reducing the amount of contaminants too.

If you can see a ring of grime has appeared on your pool waterline and you think it’s been there for a few weeks, you may find a gentle wipe is not enough, as a scum line left in the sun for weeks on end can become quite difficult to remove. If a quick wipe with a cloth isn’t working, spray with a vinyl waterline cleaner product and wipe off with a soft sponge (the sort you wash the car with – NEVER A MAGIC ERASER, and please don’t use microfibre with anything other than your pool water – don’t apply chemicals or cleaning products with microfibre).

Another product often used with success (which you probably already have under the sink) is Jif! Just a tiny amount on a sponge, and wipe gently. If that doesn’t clean it off, resist the urge to rub or scrub at it – if the grime has been allowed to “bake on” in the sun, it can become embedded in the surface. In this event, the best approach is to add a chitosan-based clarifier to the pool. Raise the water level to above the stain, then wait for the clarifier to work its magic.

If the ring is more of an orangey yellow, and doesn’t feel greasy at all, it’s possible it could be a chemical reaction between sunscreen and copper. The above suggestions should still help, but it’s important to remove the cause.

Copper is most commonly introduced into a pool through copper-based algaecides, so if adding an algaecide into your vinyl-lined pool, ensure it is not a copper-based one. Sunscreen/copper stains can appear quite literally overnight and are more likely to occur on the walls that get the most sun. Some brands of sunscreen seem to be worse than others, but if you find your swimwear or pool towels sometimes get orange stains after washing, or you have acrylic fingernails which turn a little orange or yellow after swimming you may like to try an alternative brand. Avobenzone and oxybenzone are common ingredients in sunscreens that seem to have this issue.

Testing your pool water (chemical balance is important)

As a pool owner, it’s important to keep your water ‘balanced’. The best time of day to test your water is first thing in the morning, and after the filter has been running for an hour or so.

The correct chemical balance varies depending on your pool interior finish. For domestic purposes, for a vinyl-lined pool or Aqualux Pool finish, we recommend the following levels:

pH: 7.4-7.8

Total Alkalinity: 100 – 150ppm

Calcium Hardness: 200 – 400ppm

Free Chlorine 1 – 3ppm (Non-Heated Pool) or 2 – 4ppm (Heated Pools)

Stabiliser 30 – 50ppm

Saturation Index -0.1 – + 0.4

When collecting a water sample from your pool, take it from around the middle of your pool (rather than from one end), and as far as possible from any return jets or the skimmer. Using a clean container or bottle, hold it upside down so that the opening is facing the pool floor, and insert it into the water, about elbow deep. Turn it over and allow it to fill before bringing it back out of the pool.

If you’re taking it to your pool shop for testing, go straight there – don’t stop off at the shops on the way there, as your sample can degrade after a period of time – even 15 minutes in a hot car can skew your results.

If you’re using test strips, take care to follow the instructions from the manufacturer. A basic rule of thumb is to quickly dip the strip in and out of the sample container (not straight into the pool) and hold it still (don’t shake it or flick the water off) – just hold it still for 15-20 seconds. Immediately check the colours against the strip on the back of the test strips container – your most accurate results will be at 15-20 seconds, as the colours can continue to develop as time goes on. The most important readings you’re looking at are Free Chlorine and pH.

At home test strips are a convenient way to keep tabs on your water quality – most people will do these weekly, with a proper test with their pool shop once a month.

NOTE: If you have just put a pool cover on your pool, be aware that your chemical consumption will be reduced by about half. If you have an automatic dosing system, you should turn it down to around 50%, and monitor your chlorine levels daily, adjusting settings to suit until they have stabilised.

Tea Staining on Stainless Steel

If you have a stainless steel frame on your pool fence or pool cover reel, at some point it is likely you will notice a slight brownish spotting or discolouration on the surface. Don’t panic though – chances are, it’s only cosmetic, and will not affect the structural integrity of the steel. Called “Tea Staining” or ”Coastal Corrosion”, it occurs mostly within about five kilometres of the ocean and can become progressively worse closer to the water’s edge. In high wind and exposed areas, it could affect stainless steel up to twenty kilometres away!

In the case of a saltwater pool, you have your own ‘ocean-like’ environment, due to the concentration of salt added to the pool for the sanitising system.

It is generally worse in areas of high humidity, where there is a build-up of salt and moisture on the surface of the stainless steel promoting the tea staining to occur. It is a simple and easy process to rectify the tea staining, but this will have to be done on a regular basis if the same environmental conditions still exist.

Washing your stainless steel reel off every couple of months with fresh water in a high-pressure hose is generally all you need to prevent tea staining from occurring in the first place. Alternatively, washing with clean, warm soapy water (or even just rainwater) can also reduce the occurrence.

If you already have Tea Staining present on your stainless steel, you can remove it by following these instructions:

How to Remove Tea Stains from Stainless Steel

  1. Fill a spray bottle with distilled white vinegar.
  2. Cover the entire stain with vinegar.
  3. Wait 15-20 minutes.
  4. Rub the stainless steel with a warm cloth to remove the vinegar and the stain.
  5. Rinse with warm water and wash normally.

If the tea staining has been on the stainless steel for a long time, you may have to repeat this process or at least apply more vinegar.

Where on the pool should I position my reel?

If you’re putting a solar pool cover on for the first time, chances are, you’re also putting a reel (roller) together too. So where do you put it? Ideally you should make this decision before you install the cover, because some positions will require you to leave the cover slightly longer than others.

Don’t worry if you have already cut the cover to size. It’s not a big deal.

If you have a rectangle shaped pool, the standard approach is to place the reel at one end of the pool – slightly straddling the pool, so the blanket rolls easily on and off the tube without dragging across the coping. People normally put it to the far end, so its furthest away from where they will view it from.

The reel should sit at the end of the pool, hanging slightly over the edge, so that the cover does not drag over the pool coping when being rolled up.

This reduces wear and tear on your solar pool cover, and will help to get the best life expectancy from it. (Don’t forget to put the overcover on once it has been rolled up).

If you have an oval, kidney or other irregular shaped pool, the reel should be placed over the pool, at it’s widest point. When doing this, the blanket rolls from both directions, so it rolls faster and is easier to handle too.

When using this position, the blanket should be left a little longer in the length – if after attaching the extra length is not needed, you can trim it back then.

If your pool has a step, you can treat this as a separate piece, and simply fold it onto the main cover before rolling, enabling it to be rolled onto the roller. You can see in the image below how the step piece has just been flipped up onto the body of the cover, leaving it as a neat rectangle to roll up.

Water Loss. Is it evaporation or a leak?

If you’re noticing your water level dropping faster than usual, it’s a good idea to check if its due to evaporation or a leak.

The first thing you should do is what they call a ‘’Bucket Test”.

How to do the Bucket Test:

  1. Fill a bucket with pool water, about 3cm from the top.
  2. Put the bucket on the first step of your pool.
  3. Turn off your pool pump.
  4. Using a permanent marker or pieces of waterproof tape, mark the water levels both inside and outside of the bucket.
  5. Turn your pool pump back on.
  6. Wait 24 hours, and compare the water levels.
How to do the 'bucket test'.

If the water level on the outside of the bucket has gone down more than the level on the inside, it’s likely you have a leak.

If the water level on the inside of the bucket has gone down by around the same rate, then your water loss is caused by evaporation. This can be resolved by using a pool cover.

Fact #6. Is it ok to leave my solar bubble type cover rolled up in the sun when I’m not using it?

No. You should never leave a solar cover rolled up in the sun – even for a short period of time.

The nature of a bubble cover is to allow the suns rays to penetrate through the bubbles. When rolled up on roller or reel, these can build up heat internally through the multiple layers to the point of expanding the bubbles, over-heating the plastic and in extreme cases,  melting the layers together! The expansion of the bubbles on the flat side of the solar blanket is evidence the cover has been exposed to heat and the Sun when not on the pool. This can cause the cover to appear to shrink in size as the upward expansion of the bubbles, causes the cover to contract and measure less than before the bubbles were expanded.

The excess heat can cause a premature degradation of the plastic in sections across the blanket around the width of the rolled up blanket (around 300mm)  and 900mm apart which is commonly known as “Roller Burn”. This caused by not covering the blanket when it is rolled up on the Reel. The way to avoid this is to always cover the blanket when rolled up on the aluminium tube of the Roller Reel.

Again, you can confirm this by looking at the flat side of the bubbles and seeing if the layer is flat or slightly indented (normal) or raised a little, and this means the blanket has been exposed.

You cannot reverse this damage, but you can prolong the life of the pool cover by preventing any further exposure. Always use the ‘Overcover’ provided with your reel/roller to protect the solar blanket when stored.  If you do not have an overcover, you can purchase one from your poolshop, or you could make one using a reflective tarp.

ABGAL supply an overcover with all Hydrotools branded reels. It is a white, heat reflective poly tarp fabric with a cord at each end, designed to slip over the rolled up solar blanket pool cover.

My glass pool fence has exploded – how do I clean it up?

It’s one of the things you hope never happens to you. Maybe you were there and heard a loud bang – or perhaps, you didn’t know it happened until you looked at your pool and noticed a glass fence panel missing.

While it’s not common, it’s certainly not unusual for glass pool fences to suddenly shatter without warning. (Normally into a thousand pieces – all over the pool deck and sometimes inside your swimming pool!)

It happened to me just last week and this was the second pool fence panel to shatter in three years! On both occasions, we have been fortunate that no one was near the pool at the time, so all we’ve had to deal with was replacing panels and cleaning up the broken glass.

The first time, it just made a mess over my timber deck, but this time, a lot of glass fell into the pool. My pool has an Aqualux vinyl interior as they are so nice to the touch, and I must admit, I was a little worried falling glass may have cut through the surface.

I Googled “how to clean glass from your pool” and there were a few articles, but not many relating to an “exploding fence panel” so I thought I would share my experience to help others.

My immediate thought was to vacuum the broken pieces using the pool vac. I placed two skimmer socks inside the skimmer basket to trap any glass fragments and stop them flowing through to the filter. Then I connected the vacuum and proceeded to slowly move across the glass pieces.

This was my first mistake as although the fence shattered into small 10mmx10mm size pieces, many of them were clumped together and too big to fit through the vacuum head opening or suction hose.

So I changed tactics – this time opting for a handheld broom and long-handled dustpan.

This worked a treat!  Working very gently and slowly, I broomed pieces of glass into the pan, just a little at a time, so I could easily lift the dustpan out of the pool (without dropping any pieces) and empty the glass into a large bucket.

I repeated the process until I had swept up all the pieces that I could see. By the way, it is much easier to see glass in the pool in full sun as the glass reflects under the water.

After removing all the large pieces with the dustpan and broom, I vacuumed the entire floor area carefully to pick up smaller slithers.

Total clean up time took about 2 hours.

A week later, I am very happy to report that my pool fence company has replaced the panel, and my Aqualux pool finish was up to the challenge, and proved tough enough to withstand the glass and has no cuts or leaks!

Are you thinking of buying a robotic pool cleaner?

In the past, almost everyone used a suction cleaner or pool vaccuum, and we all became accustomed to swimming around the hose, and listening to that ‘tick tick tick’ sound whenever we were near the pool!vacuum hose

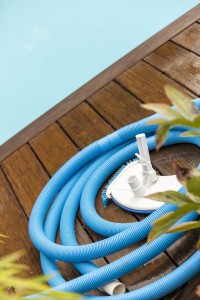
However, in the last few years, robotic cleaners have become quite affordable, so are gaining popularity with pool owners. But while it is true that a robotic cleaner can be used in any pool, not every robotic cleaner is suitable for every pool.

If you have an abrasive pool surface such as pebble, you’ll need a cleaner that is strong enough to scrub the surface clean, and durable enough to tolerate any wear against the cleaner skirting.

On the other hand, if you have a soft and flexible surface finish such as vinyl, you need to ensure a robotic cleaner has no sharp edges, and that the tracks and rollers are gentle enough to not cause wear on the pool finish. With all pool finishes, it is also important to ensure there is enough clearance on the underside of the robot to avoid rubbing and scraping against the surface.

So which is better to use? Robotic or suction? It really is a matter of opinion. Suction cleaners have been the norm for many years in Australia, and they generally do a pretty good job, for a very reasonable price. But all pools are different, and no cleaner is perfect (there is usually a corner or step, or some other spot in every pool where the suction cleaner always seems to miss!)

Plus you have to wrestle with the cleaner and hose when you want a quick swim as most pool owners just don’t bother to remove the vacuum from the pool. And when you do finally take the vacuum out, no one ever lays the hose out nice and straight, to minimise any effects of hose kinks on the cleaner’s performance. (Suction cleaners rely on the hose to help control the area they cover and the direction they take).

I’ve personally owned a number of suction cleaners over the years, and a couple of robots, so I thought I’d put together some of my thoughts, to help anyone who is tossing up between a suction cleaner and a robotic cleaner.

Robotic cleaners are designed to be put in the pool once or twice a week for up to 2 hours to roam around the pool in a random pattern and vacuum all the dirt and leaves from the floor and walls. The biggest issue I have with robots is the cleaning! That’s right – you need to clean the cleaner! They need to be cleaned every time they do a full pool clean.

I liked my suction cleaner’s handling of the dirt and leaves, it just sends it all to the pool filtration system. I found my sand filter much easier to clean than the cartridges of the robot – it was just a matter of switching off the pump, turning the valve, then running the pump until the waste water was clear, selecting rinse for a minute and then back to normal filtration. Quite easy really, and only takes about 7 minutes.

The robot takes about 7 minutes each time I clean it – and I have to do this at least every week – whereas I only backwash my sand filter every 4-6 weeks. However, I love the fact that my pool has NO cleaner in the water most of the time and no annoying “tick”, “tick” sound or the surface of the water rippled all the time.

And, when I go for a swim, I jump straight in and don’t have to remove the suction cleaner and store it alongside the pool edge. Now putting the robot in the pool and getting it back out requires a bit of strength, especially getting it out when as you have to wait for the water to drain out before lifting it otherwise it is quite heavy.

Now – the effect of the cleaners on your pool finish. The suction cleaners are often left in the pool all the time as some people choose to swim with them as it is easier. The problem is, for 8 or more hours a day in summer, the suction cleaner is rubbing over the pool surface. If you have an abrasive surface, this will wear the cleaner skirt and some other parts. If you have a soft surface such as PVC, the suction cleaner can rub and wear the surface over time, and if it doesn’t move evenly over all parts of the pool, you may see its common path in form of a wear track, usually around the wall to floor junction.

The concept of a robot being more compatible with all pool surfaces comes from the fact they are only used for a short period of time – BUT you need to make sure you have the correct tracks and rollers for your pool surface finish.

If your pool surface is quite abrasive, then the robot will have less wear on its tracks and rollers as it is only used for relative small amounts of time, but the wearing parts need to be compatible otherwise you will need to replace them quite quickly. If your pool has a soft finish, the robot makes sense as again it is only used for small amount of time, but you need to make sure the areas of contact with your pool finish are compatible so as not to create wear spots.

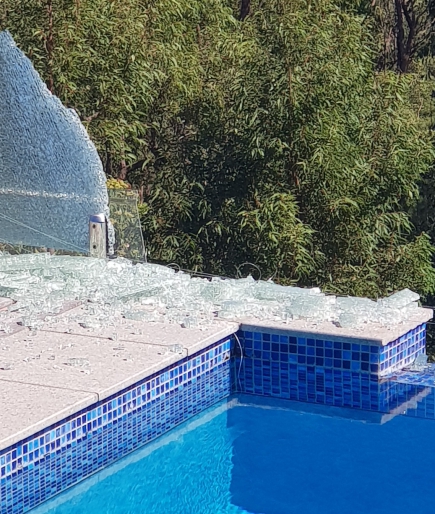
One of the considerations for your pool before you purchase a robot if you have a softer finish is to ensure the shape of the surface is free of sharp edges, and that there is enough clearance of the underside of the robot to avoid rubbing and scraping these edges, as the hard plastic of the robot body can cause abrasions.

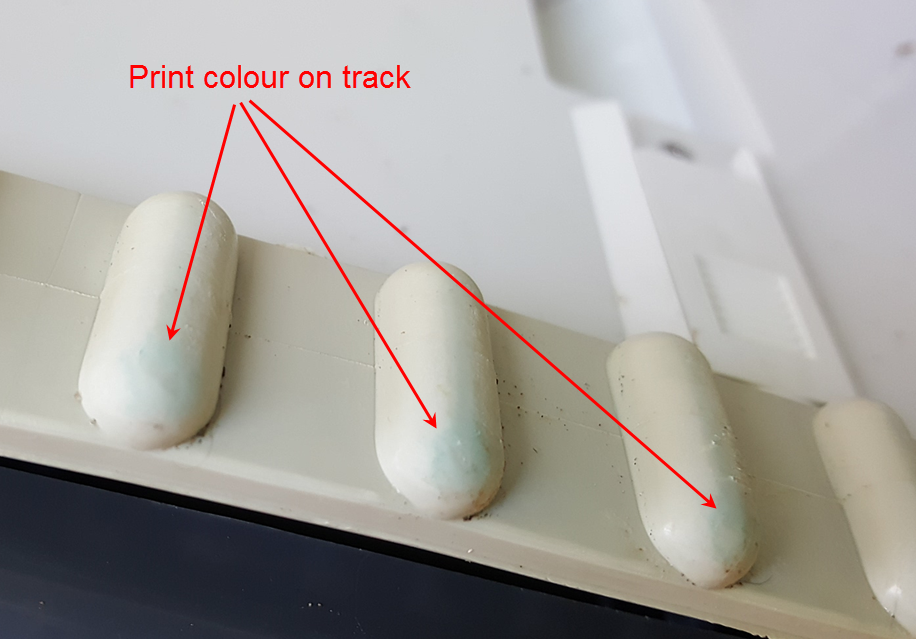
If you ever suspect your robot has caused abrasion to your pool finish, just check the tracks and the underside of the unit – you will likely see some of the pool surface colour on it and maybe some worn plastic parts.robotic cleaner print rub off on tracks

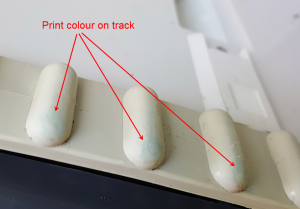
So in my opinion, if you are on a budget or don’t mind swimming with the hose and cleaner, or removing it every time you swim, a suction cleaner will work for you.

If you want the clean look of a pool without a hose and cleaner 99% of the time and happy to rinse off the cartridges after every clean, then a robot will suit you.

Remember, no cleaner is perfect, but they sure beat having to set up the vacuum hose, handle and brush and cleaning the pool manually yourself!


My pool has black or grey staining on the interior surface, what is the cause?

There are three main causes of what appears to be staining or marks on a pool interior surface.

The first, and most common cause of staining or discolouration of a pool interior is algae. This will start in an area where water circulation is not good, like the deep end or comers of the pool.

Or, it could be caused by algae feeding off debris in an area from overhanging foliage or just a basic lack of enough chlorine to maintain the water balance.

By the addition of an algaecide or a super dose of chlorine, the algae will die and then it can be brushed off the pool surface and permanently removed. Some more stubborn types of algae like black spot, need to brushed before the addition of chemicals as their outer surface forms a protective barrier to chemicals.

By brushing and breaking the outer surface, it allows the chemicals to more easily kill the algae so it can be removed. Provided the correct chemical levels and good water circulation are maintained, it will be removed permanently.

The second type of staining is from metals in the pool water. These metals can be introduced by ionic sterilising systems or even from a water source (town water through an old copper pipe or bore water) that contains a higher than normal level of metals when filling or topping up the pool.

If increasing the acidity (lowering PH in the pool) removes the staining temporarily, then it indicates a problem with metals. If you re-adjust the PH and the stain re-appears, then this confirms it is caused by a high concentration of a metal in the pool water. Lowering the PH just puts the metal into solution, it doesn’t remove it from the water and that is why it will re-appear when the PH is balanced – it precipitates from solution and plates onto the pool interior surface.

To remove the metals, you need to dilute concentration by using a chelating agent or draining a substantial amount of the pool water and re-filling with fresh water (without metals).

The third, (and very rare cause of staining), can be microbial activity under the interior surface of the pool. If in this example the pool has a PVC liner, it is possible for ground water contamination under the liner to encourage microbial activity. These microbes feed off nutrients in the ground water (like seepage from a septic system or other grey water) and they secrete dyes that will stain the liner from the underneath and can flow through to the inside surface of the pool.

Once this dye staining has occurred, the stain can be lightened sometimes with the addition of high levels of chlorine introduced into the pool, but usually the staining is permanent and cannot be removed.